Understandably, for some newcomers of the hotel, motel and resort game, using CMS’s (Content Management Systems) can be a little daunting. Uploading, downloading, importing, exporting, it all takes a little patience and learning.
This tutorial will show you how to import your contact or guest database into iLaunch to utilise for email marketing campaigns or newsletters for your property. You can even create specific groups if you wish to segment your contacts.
Importing CSV Files
You need to firstly ensure that your guest database is an excel file, exported from Hirum, Ezy Rez etc. This then needs to be saved as a CSV file. You can choose this option when you go to save any Excel Spreadsheet:

Importing Your Contacts
Login to your iLaunch Admin, then click on Newsletters > Import Contacts.
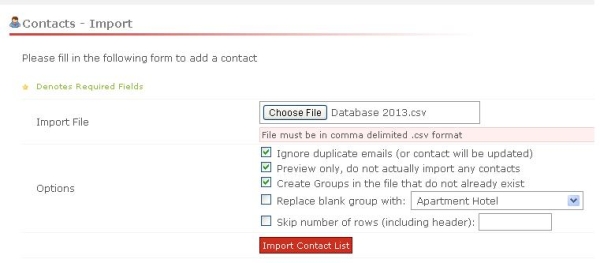
Choose the CSV file that you have saved:
-
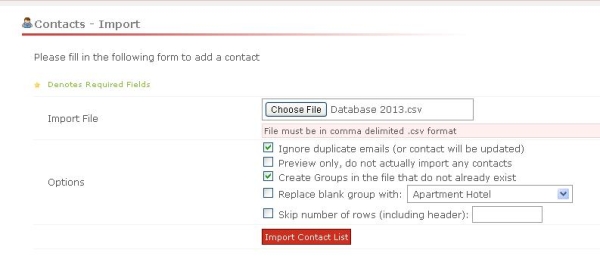
Tick the ‘Ignore duplicate emails’ box -
Tick preview only, to see if there are any addresses that need fixing eg. ash@//mail.com -
Leave ‘Create Groups in the file that already exist’ ticked -
Only tick ‘Replace with blank group with:’ if you are importing contacts to a certain group
eg. October 2013 Guests. (Instructions on how to add a ‘group’ are below) -
Click ‘Import contact list’

Preview the addresses, if any need fixing, go back to the spreadsheet and find that particular address and amend.
If they’re all ok, follow the above process again – you will need to choose the file again, however this time, do not tick the ‘Preview only’ box:

Contacts will now be successfully imported, and will be included in future email campaign sends.
Adding Groups
You can add a specified group, by completing the following:
-
Admin > Newsletters > Add Group -
Type in the name of the Group Eg. October 2013 Guests -
Click Add Group
To add contacts to group, follow the steps as above, but ensure you tick ‘Replace blank group with’ and choose the group you wish to upload these contacts in.
And that’s it! You now have a database of contacts in your CMS.
Related pages and blog posts:
– How To Use Newsletter Campaigns in iLaunch
– Achieving Greater Email Marketing
– iLaunch Content Management System


More Stories
Backpacking Journeys: Adventure Awaits on Every Path
Backpacking Journeys: Go Further, Explore Deeper
Backpacking Journeys: Find Solitude in Nature’s Beauty